
Back to Basics : JavaScript : Part 1
At the beginning of the year, I decided to enhance my JavaScript skills. I have always considered focusing on a skill and increase my expertise by learning from the experts. In this context, I came across many JavaScript teaching courses, but only one worked well for me. It is the Vanilla JS Academy by Chris Ferdinandi.
I loved Chris’ practical approach of taking big concepts and breaking it down into smaller video bytes coupled with practical examples. This series will cover topics related to basics of JS that I learnt as a part of the Vanilla JS Academy. And give my own spin on the concepts to help me solidify my understanding.
Getting an element in DOM
To get an element in DOM, you need to use the document.querySelector method. The document.querySelector method gets the first item that matches the condition. The method can be combined with multiple attributes to get the desired result:
//To get a class, we use the dot(.) notation and to get an ID we use the hash(#) notation

// Uses the class :
let btnClass = document.querySelctor('.services__item')
console.log(btnClass);

//Uses the ID
let btnID = document.querySelector('#services');
console.log(btnID);

// Uses the data-* attribute available
let btnDA = document.querySelector('[data-analytics = "item1"]');
console.log(btnDA);
Getting multiple elements in DOM
Above, we saw how to use the document.querySelector method to get just one element from the DOM. If we need to get multiple elements, then we use the same logic, but we use the document.querySelectorAll method instead. This method gets you access to all the DOM elements that match the criteria.
//To get a class, we use the dot(.) notation and to get an ID we use the hash(#) notation

// Uses the class :
let btnClass = document.querySelectorAll('.services__item')
console.log(btnClass);

//Uses the ID
let btnID = document.querySelectorAll('#services');
console.log(btnID);

// Uses the data-* attribute available
let btnDA = document.querySelectorAll('[data-analytics = "item"]');
console.log(btnDA);
Listening for event interactions
To listen for event interactions, we use the element.addEventListener method. The addEventListener method listens for the interaction type such as click , hover keypress and passes a callback function to run for when the event happens. There is a bunch of event listener methods available on the MDN link.
For our use case, we will listen for clicks on the services section of our page, and when the event occurs we fire an addEventListener method. In the callback function, we will pass the event object which will give us access to properties - related to the event that was clicked and other values. One of the most useful properties is the target property which will get us more details of the element that triggered the event.
let btn = document.querySelector('#services');
btn.addEventListener('click', function(event){
   console.log(event);
   console.log(event.target);
   console.log(event.srcElement.outerText) // will return the text of the element that is clicked
});
Project Toggle Password
In this project, Chris talks about using the document.querySelector method to toggle password field to enable sort of a show/hide switch. The important thing to note is that the variables can be declared in a mixed fashion. Here is my script:
      let toggle = document.querySelector('.toggle');
      let password = document.querySelector('#password');

      toggle.addEventListener('click', function(){
        if(toggle.checked){
          password.type = "text"
        } else {
          password.type = "password"
        }
      })
I declare the toggle variable with the class of toggle and the password variable with the ID of password.
Then I add an addEventListener method to the toggle variable. The method is waiting on a click event to trigger. In the call back function, I check if the toggle.checked attribute is true or false. If true which means the user wants to see his password, we change the type of password field to text or else if we change it back to password.
Here is the project in action:
Objects and Using a for…of loop
What is an object?
An object is a colletion of a properties. For e.g. a car is an object. It contains properties such as: car.name; car.color; car.weight; car.gearbox etc. The values are always written as name:value pairs. An object can contain a single property or a number of properties.
In JavaScript, almost everything is an object like strings, arrays etc. Some of the important ones are listed below:
- Arrays: A set of values defined within a square bracke is called an
Array. In JavaScript, Arrays are always objects - Strings: A set of values defined in text form
- Booleans: A true/false value defined with the new keyword
- NodeList object: A
NodeListobject is a list of nodes extracted from a documentconst buttons = document.querySelectorAll('buttons')will return a NodeList of all the buttons in a page that can be iterated over - HTMLCollection object: A
HTMLCollectionobject is an array-like list of HTML elementsconst HTMLColl = document.getElementsByClassName('services-item__caption')will return a HTMLCollection of all the elements that have the specified class in it
There are different ways to create an object in JavaScript:
Using Object Literal
const car = {make: "Honda", model: "City", color: "Metallic Brown"}
const carNew = {}; carNew.make = 'Honda'; carNew.brand = 'City'; carNew.color = 'Golden Brown';
When you console.log the car object, you will see the three key value pairs being listed. What you have declared is a simple object.
Using the new keyword
const movies = new Object(); movies.firstChoice = 'Interstellar'; movies.secondChoice = 'Inception'; movies.thirdChoice = 'The Dark Knight'
Extracting values from an object
Since objects are comprised of a list of key-value pairs, we need to method to extract each key-value if we need to work with objects. There are different methods available.
The for...of method
The for...of statement loops through the values of an iterable object. Iterable objects are objects that have iterable properties.
The for...of loop doesn’t iterate over plain objects. It can only iterate through objects such as strings, arrays, and other array-like objects such as NodeLists, HTMLCollections and HTMLFormControlsCollection. This is an important information to know to avoid code errors.
For e.g: The loop will work over an array which is an iterable object
let favMovies = ['Interstellar','Inception','The Dark Knight'];
for (let favMovie of favMovies){
    console.log(favMovie);
};
…but it will not work over a plain object
`const car = {make: "Honda", model: "City", color: "Metallic Brown"}`
for (let carProp of car){
    console.log(carProp)
}
If you run the loop above, you will get a car is not iterable TypeError
The Array.forEach() and NodeList.forEach() method
The Array.forEach() method provides a simple way to iterate over arays while still having access to the index. Here’s how we can use it:
let favMovies = ['The Dark Knight','Inception','Interstellar','The Prestige'];

favMovies.forEach(function(favMovie, index){
    console.log(favMovie);
    console.log(index);
});
When you execute the above method, you will get a list of all the items as well as the index position that they are sitting on.
The NodeList.forEach() method loops over the node list items without having to declare them first in a separate variable. Here’s how we can use it:
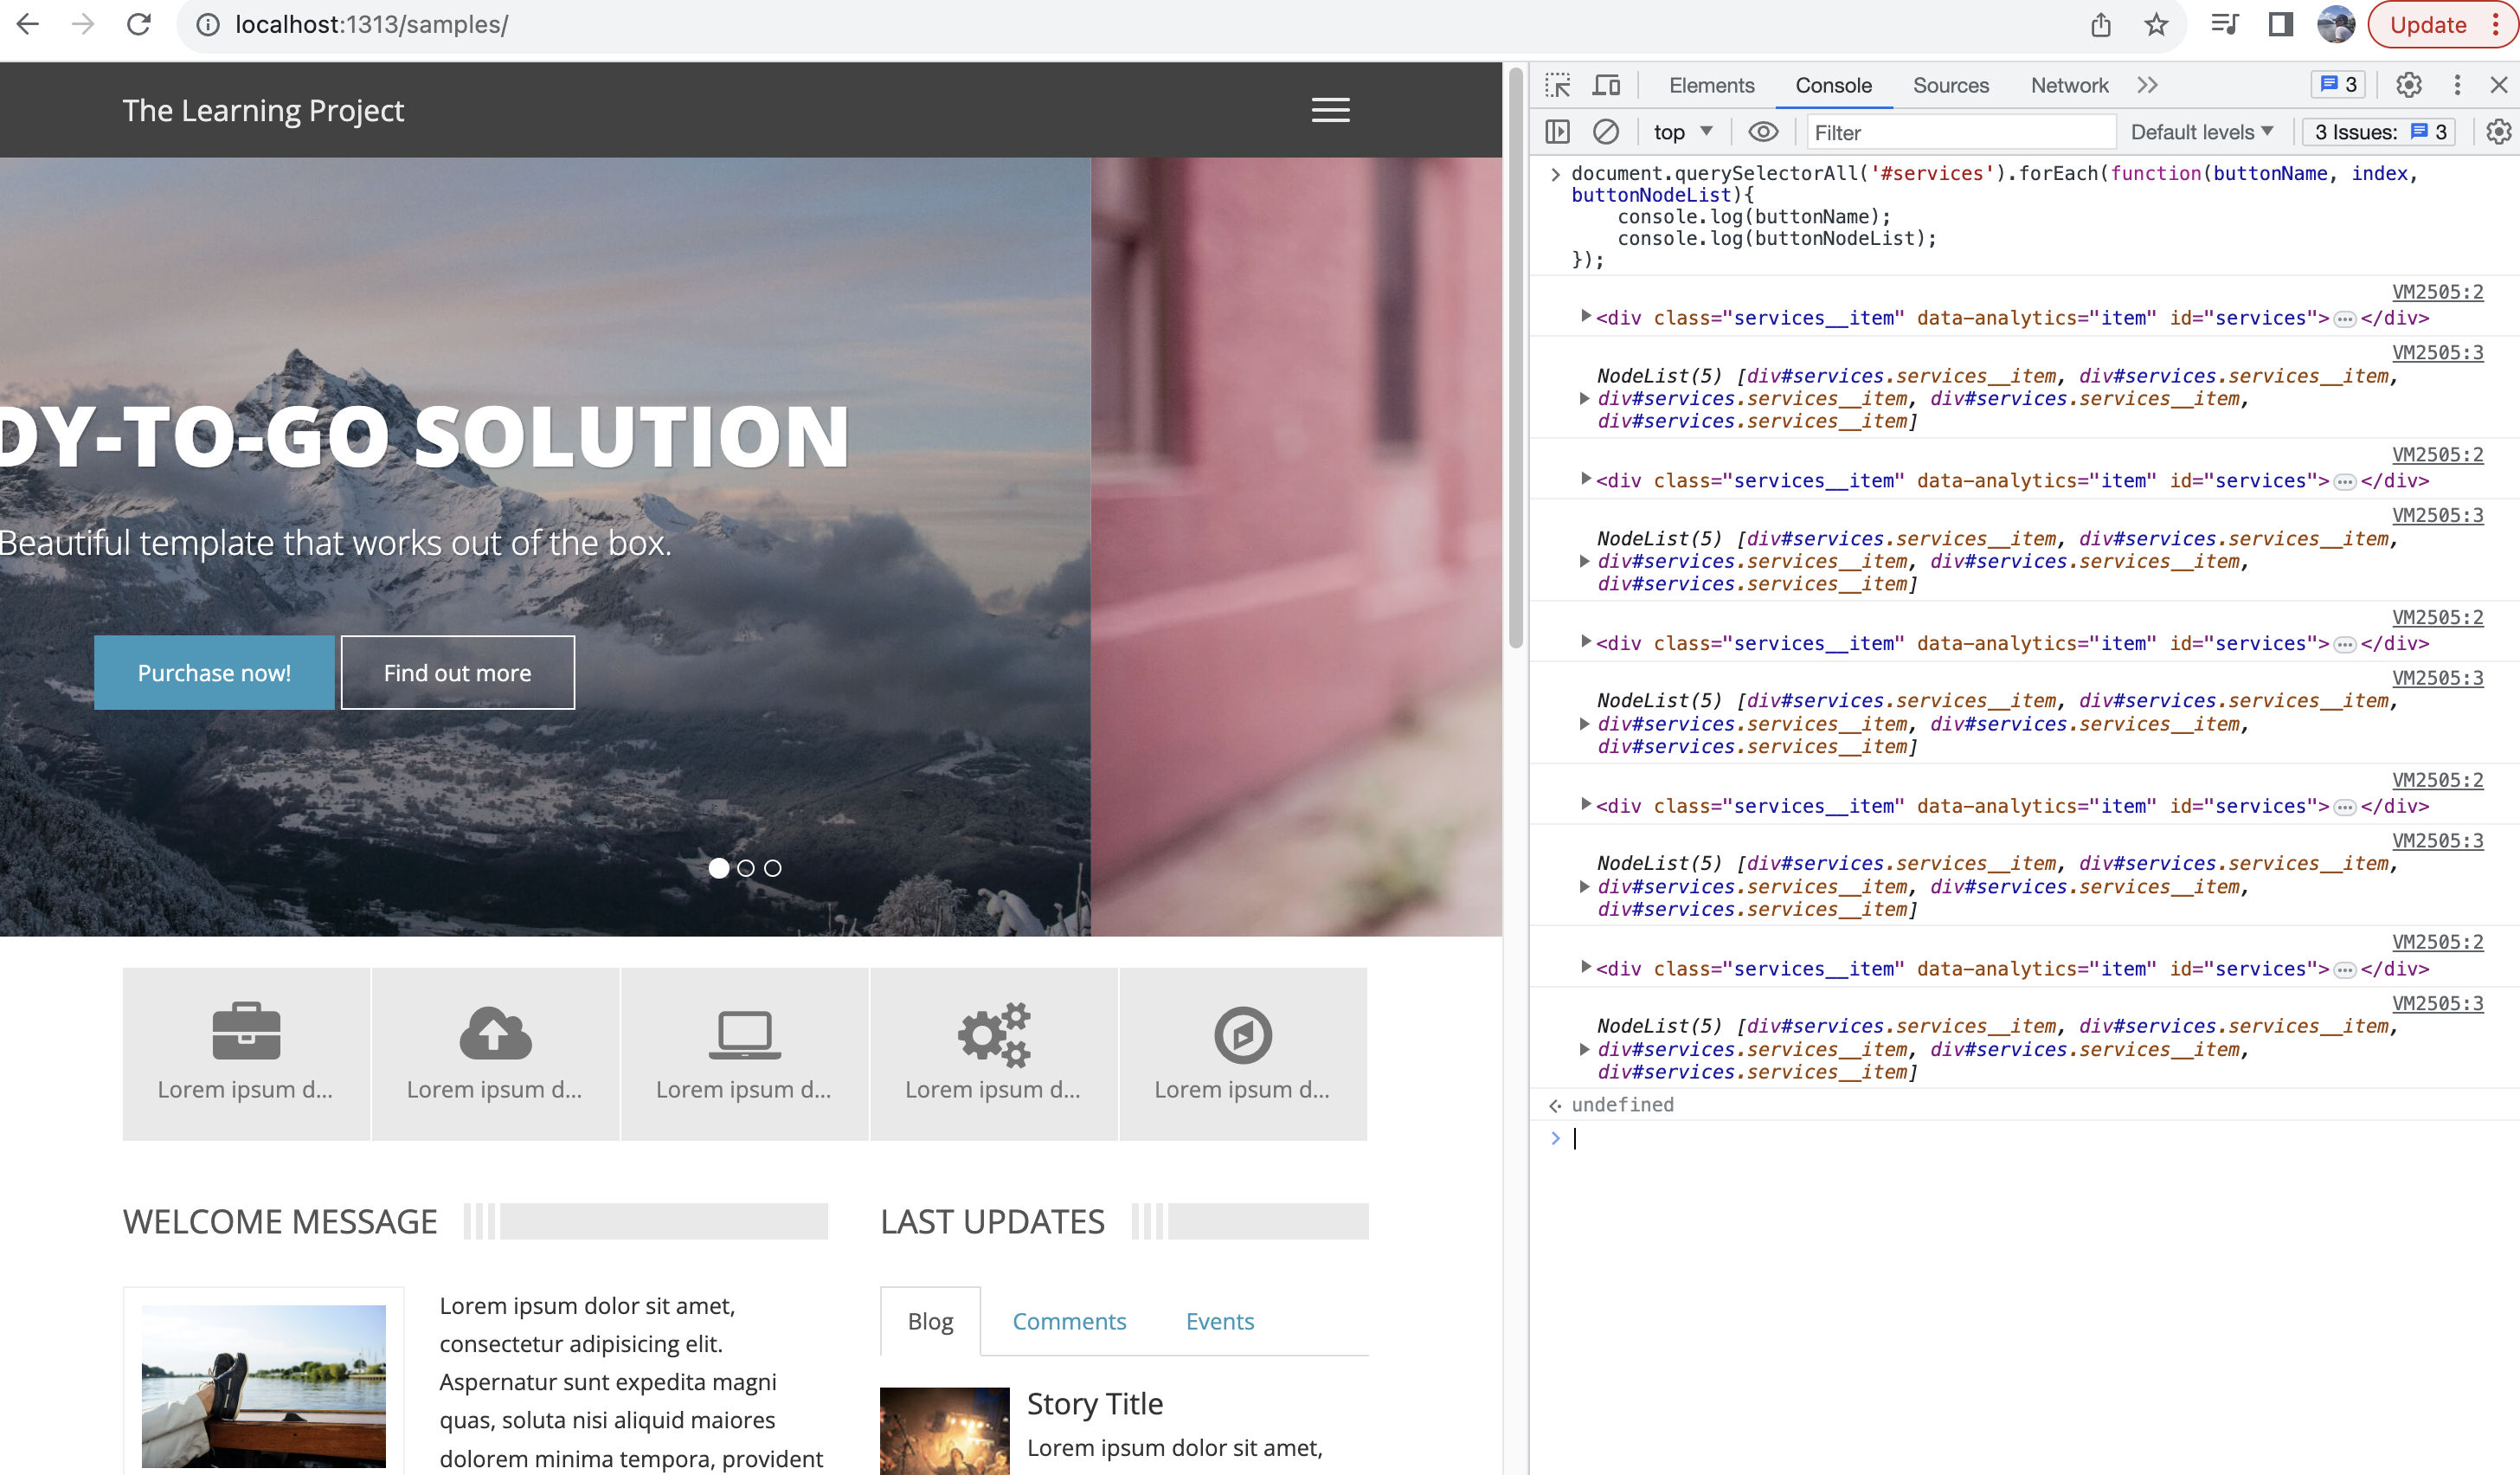
document.querySelectorAll('services__item').forEach(function(buttonName,index,buttons){
    console.log(buttonName);
    console.log(buttons);
});
We first use the querySelectorAll method to query the items with the class name services__item. We then immediately use the forEach method to loop over the items. In the callback function we return:
- the current item
- the index of the current item
- the entire NodeList
The output is as below. We get to access individual buttons and also a node list of all the buttons available.
Project : Show multiple password
In the first instance of this project, we saw how to have a checkbox which, when clicked, can show the password that the user has typed. In this enhancement, we will see how to show the password that the user has typed in both password and re-enter password field. Here is my code:
//Get the field
      let passwordFields = document.querySelectorAll('[type="password"]')
      let toggleBtn = document.querySelector('[type = "checkbox"]');

      //add an event listener click to the toggle button
      toggleBtn.addEventListener('click', function(){

      //use a for...of loop to loop through the password fields and pick one by one
        for (let password of passwordFields){

          //listen for checked on the toggle button
          if(toggleBtn.checked){

            //set the password type to text or password based on the above
            password.type = "text"
          } else {
            password.type = "password"
          }
        }
      });
Here is the project in action:
That is all for this blog post. Leave me a line on ritesh@thelearningproject.in to share some JavaScript basics that you might be interested in sharing.
